Pinging Windows Server 2008

Windows Firewall
Windows Firewall

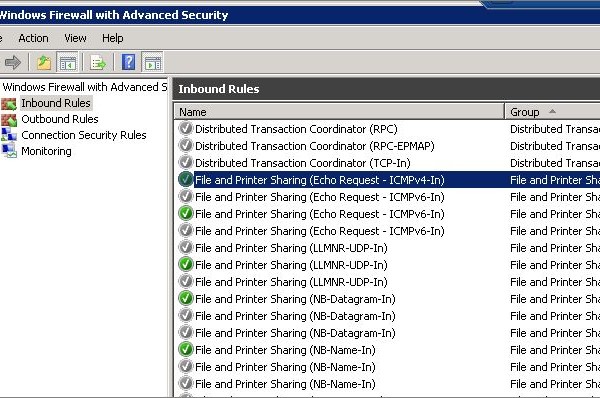
Enabling File and Printer Sharing (Echo Request - ICMPv4-In)

One of the most common ways for an administrator to see if a particular server is up or not is to send an ICMP packet to the server or in orther words, to ping it.  This is also known as sending an Echo Request to the server.

As Microsoft tightens security on Windows Server 2008, they have the built-in Windows Firewall blocking ICMP requests by default.  We have a couple of options to unblock this or enable the ping request and reply.  Here’s how you can turn this on using the MMC [Read more…]

Programmatically Ping a Networked Device

I would say Ping is one of the most popular methods used to troubleshoot network issue. When a networked device or server goes down, one of the first things a network engineer or a system admininistrator do is try to ping it and see if it can be reached.

This blog will show you two ways to ping a device so you can integrate the ping feature into your own application.

The first and easiest way to issue a ping command is to call the Ping method in the My.Computer.Network class:

If my.Computer.Network.Ping("www.google.com") Then
MsgBox("device up")
Else
MsgBox("device down")
End If

The drawback of this method is that it only gives you a boolean as the result to indicate whether the device is up or down. It doesn’t provide any other details like RTT, TTL or any error code for that matter.

The second way is to call the Ping.Send() method in the System.Net.NetworkInformation namespace which returns a PingReply object through which you could get more detailed information about the ping reply:

Dim myPing As New System.Net.NetworkInformation.Ping
Dim PR As System.Net.NetworkInformation.PingReply
PR = myPing.Send("www.yahoo.com")
If PR.Status = IPStatus.Success Then
MsgBox("Reply from " & PR.Address.ToString & ": BYTES=" & PR.Buffer.Length & " TIME<" & PR.RoundtripTime & "ms TTL=" & PR.Options.Ttl) Else MsgBox(PR.Status.ToString) End If

There you have it. Two ways of pinging a networked device. If you just need to check and see if a device is up or down, the first method might do just fine; however, if you need to gather some other statistics then obviously, the second one is the better choice.

I recommend that you read up on the PingReply object to get more information from the ping reply. If you wanted to implement some sort of Ping functionality as in Pinkie's then that's the way to go.

Using Ping Feature More Effectively!

Ping is one of the features of Pinkie that I use extensively as a network admin.  In this blog, I’ll show you how to take advantage of all the extra enhancements that come with Pinkie which you don’t have in the Command Window.

  • Ping Multiple Hosts: Press F1 to bring up the Add Host Address dialog. Enter hosts/IP addresses which can be separated by space, comma, semi-colon, tab or a line feed.
  • Reduce/Increase # of Rows Displayed For Ping Results: By default, Pinkie will show you 4 lines of ping results. This can fill up the window pretty quick if you ping multiple hosts at the same time. To reduce the # of rows, press F3 or increase it by F4.
  • Check Ping Statistics For a Host: Select a host by clicking on it, the status bar at the bottom will change to show the ping statistics for the selected host which includes packets sent/received, lost count & percentage, last ping RTT along with Min, Max & Avg RTTs.
  • Start/Stop a Ping: Right click on the host you want to start/stop pinging, select Ping first menu item in the context menu will change to Start/Stop as appropriate. Clicking on it will stop a ping in progress or start it if it’s not started yet.
  • Reset Ping Statistics: Right click on a host you want to reset statistics, select Ping then click on Reset Statistics.
  • Copy Ping Results: When troubleshooting network or server issues, you might have the need to send the ping result to someone. This can be done by simply right click on the host and select Copy Result to Clipboard. then paste it to an email or wherever you wish.
  • Logging Ping Results to Disk: If you wish to log ping results to a file to analyze later or send it to someone else, right click on the host, select Ping then in the context menu, click on Start Logging or Stop Logging as appropriate. By default, the ping results will be saved in C:\Users\[username]\Documents\ipUptime.net\Pinkie_Logs\. You can change this path in the Settings menu.

That’s not all of the enhancements that come with the Ping feature in Pinkie but it will definitely make you like and use Pinkie more.

If you can come up with a better way to use Ping or wish to have enhancements added to it, please let me know.