Redirect Procurve’s output to TFTP Server

So last night I learned another Procurve command that’ll redirect the output and send it to the TFTP Server instead of the terminal client. I was hoping to use one of these days and little did I know I would get to use it as soon as I get to work today.

It just happened that I have a Procurve switch that crashed and rebooted itself multiple times. There were something odds about it so the logs need to be sent to the support staff so they can do their thing. Normally, I have my terminal clients logs all output to a file and just run Show Tech and Show Log commands then copy the files to an email. But like any other diagnostic commands, these can take a long time to run through and it’s so true when you get to enterprise line of products so I thought I’d try the command I learned last night.

Redirect Procurve’s command output directly to TFTP server:

SYNTAX:

Copy command-output “command string” tftp ipAddress dest-file-name

EXAMPLES:

Copy command-output “show tech” tftp 1.2.3.4 switchXYZ-showtech.log
Copy command-output “show log” tftp 1.2.3.4 switchXYZ-showlog.log

WHAT IT DOES:

Redirects the command output to a file then sends it to a TFTP Server.
Really handy when it comes to long running command like Show Tech or Show Log.

Note that for this to work, quotations are needed around the command for which you want to redirect the output and TFTP Server must be running (guess which TFTP Server I was running – That’s right, Pinkie!). Further more, there’s no feed back when you execute this. The only form of feedback is if you are to watch the TFTP file transfer request, you’ll see that an incoming request is initiated and the specified file appears in your TFTP folder.

Using the commands above, I was able to gather the logs in a fraction of the time that it normally takes if I was doing it the old fashion way – which is just run the Show Tech/Show Log and let the info scrolls through the screen.

Procurve’s Output redirection isn’t limited just these two aforementioned commands. You can redirect other’s command output too. Just remember to wrap the command around the quotation marks.
Procurve Code Upgrade

showcmd

I just recently when through a round of code upgrade (at least 3 firmware versions each) on 300+ Procurve switches and so I thought I’d share with you what I had gone through.

My buddy Dean & I were tasked to upgrade a number of switches.  What we did was breaking them down into three phases spanning 3 days for a total of 16 hours window.  Although we had HP Network Automation (HPNA) available at our disposal, but I chose to do this manually due to a number of factors including code version inconsistency, boot room, primary vs secondary software image… Plus I also wanted to see how far we can push Pinkie so it was a perfect scenario doing the upgrade manually.

First, let’s talk about how we can push the images to the switches then we’ll go through the issues encountered during the upgrade and how to tackle them.  So, there are a number of ways you can get a firmware onto a HP Procurve switch. Let’s walk through them real quick:

1. X-modem: Slow, unsuitable for production environment upgrade.  Handy to recover corrupted flash.

2. USB Drive: Fast, efficient way to transfer, only available on certain code version.  Not suiteable large scale upgrade.

3. TFTP: Fast, efficient, requires IP connectivity.  Suiteable for production code upgrade.

Of the available options, only TFTP file transfer was suitable to do what we wanted to accomplished.  There were a number of TFTP servers available but being that I wrote Pinkie, I wouldn’t want to use any other TFTP server but Pinkie itself.

So how did we manage to upgrade 3 or more code versions on 300+ switches in under 16 hours change window?  Preparation.  Preparation was the key.  Prior to the actual change window, we staged both primary and secondary firmware with the next code versions.  If you are not familiar with Procurve firmware, they have to be upgraded sequentially since the firmware ties in with the boot-rom (I’ll explain in another blog post).  When the change window came, we used our terminal client and SSH’ed into the switches, rebooted them while having Pinkie constantly pinging them.  As soon as they came backup, we logged in again booted to the other image using the boot-system flash [primary/secondary] command.  After they came up the second time around, we pushed the third and final firmware (for most of them) to the switches using copy tftp flash command and rebooted again.  All the commands were prepared in little code snippets and pasted into the terminal client so it went rather smoothly.

At some point during the operation we had pushed Pinkie so hard (there were some 30-40 simultaneous TFTP requests going at the same time) that it locked up the user interface.  We thought for sure that it’s gonna crash but Pinkie hung in there and finished all TFTP file transfers even though the screen didn’t get updated for quite some time.

During the process, we ran into a number of issues.  One Procurve 3500 yl switch had corrupted flash.  We didn’t have time to repair the corrupted flash on the 3500 on the spot so we replaced the whole switch and opted to repair it later when we have some time on hand.  And it was successfully repaired using x-modem file transfer the next day.

There were a handful of 5406 yl switches that had corrupted flash also.  But for those, we were able to pull out the management cards and swapped out the flash memory then put them back to service.  The thing is you’ve gotta have a spare management module with the flash card that has firmware compatible with the boot rom on the bad management module.

Below are some commands that we used during the code upgrade process:

boot – reboot the switch to the current image.

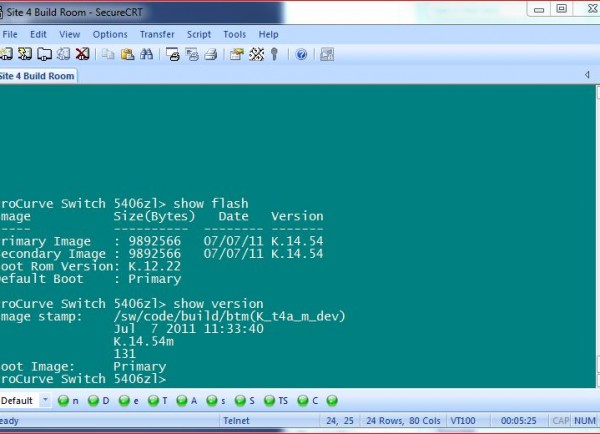
show flash – show the firmware version on both primary and secondary boot images.

show version – show the running firmware and next boot image.

copy tftp flash… – initiates a file transfer request and copy the firmware from tftp server to the switch.

copy flash flash [primary/secondary] – copy the firmware from one slot to another.

That’s pretty much how we did it but like I said in the beginning, we broke it down into 3 phases.  The first phase we did it on a single POD of about 40 switches to get a feel for it then we double it on the second phase and finally on the third one, we did the rest of them.

One important thing I should note is that you need to look out for distribution switches – either do them first or do them last.  I overlooked one of them and as the result, I had to wait for it to finish before I could touch the aggregation & edge switches.  And it just happened that one of the distribution switches had corrupted flash so that delayed our code upgrade process longer than expected; although we did finish it under our reserved window for the change.

There you have it.  That’s how I did my firmware upgrade and the issue that I ran into during the process.  If you have any tips & tricks on how it could be done better, by all means, let me know.

Know Your TFTP Server

From the previous blog, What is a TFTP Server?, we know that a TFTP is a file transfer protocol, running on UDP port 69 and typically used to transfer files to/from network devices. Now let’s take another look at TFTP and learn what to look for in a TFTP Server.

TFTP was first drafted in the early 1980’s in RFC 783 which specified a 16 bit Block number with 512 bytes or octets per data packet. As the result, the maximum file transfer using TFTP is 32MB’s. That was sufficient in the 80’s when it was proposed but as computing grown and technology advanced, 32MB’s became insufficient so in the 90’s a host of RFC’s were proposed and revised the TFTP Protocol to its current standard.

The latest of the TFTP related RFCs includes RFC 2347 (TFTP Option Extension) which provided the flexibility to negiotiate additional optional parameters and extends the capability of the orginal RFC and yet still be compatible with legacy software and/or devices implemented the earlier RFCs. It paved the way for others like RFC 2347 (TFTP Block Size Option) & RFC 2348 (TFTP Block Size Option).

RFC 2348 – TFTP Blocksize Option: Blocksize Option allows for the negotiation of the block size value to be in the range of 8 to 65,464 octets instead of the fixed 512 octets and extends the file size from 32MB’s to about 4GB’s (65,636 x 65,464).

RFC 2349 – TFTP Timeout Interval & Transfer Size Options: Timeout Interval Option specifies the amount of time a server will wait for an acknoledgement packet (Option Acknowledgement or OACK) before resend the previous packet. Transfer Size Option lets the receiving device knows how big the file is before the transmitting it. This is done to conserve bandwidth by making sure the receiving end can store the incoming data instead of blindly transmitting the data until the receiving end chokes on it. Some software like Pinkie also takes advantage of this option to calculate and report the progress of the file transfer thus providing a more responsive User Interface.

So in summary, when choosing your TFTP Server, you should choose one that can support Option Extension, Blocksize Option as well as Timeout Interval & Transfer Size Options. This can help you avoid potential issues when transferring firmware to network devices; especially to high end Cisco switches whose firmware tend to be larger than most others.

As a network tool, Pinkie has a multithreaded TFTP Server built-in and implemented all of the aforementioned RFC’s. It also does so in a unique One Window, One App architecture that can help reduce the desktop clutter, cut down the number of application you have to maintain and update. If you haven’t done so already, download Pinkie and try it out.

Further Readings:
RFC 783
RFC 1350
RFC 1782
RFC 1783
RFC 1784
RFC 1785
RFC 2347
RFC 2348
RFC 2349

What is a TFTP Server?

In this blog, I’ll attempt to give you some highlights of what a TFTP Server is without going too deep into the technical details, how it operates and what you should know about it.

TFTP stands for Trivial File Transfer Protocol. As the name suggests, TFTP is a mechanism to tranfer files from one device to another. It is typically used by network administrator to copy configuration file, log file and firmware to/from networking devices.

TFTP was designed to be small, simple and easy to implement. It uses UDP port 69 and runs on IP networks. It doesn’t provide any kind of error handling capability so all the error handling has to be done at Layer 7 – the Application Layer.

Per RFC 1350, a typical TFTP data payload has a minimum of 4 bytes and 516 max. The TFTP data packet has the following format:

OpCode Block # Data
2 Bytes 2 Bytes 0-512 Bytes

The OpCode signals the type of operation whether it is a read request or a write request… The Block # contains the block number or ACK number of the data packet being transmitted. The Data field ranges from 0 to 512 bytes in length. If it is exactly 512 bytes, then there is more data to follow; otherwise, it is the last data packet and signals the end of the file transfer.

It is important to know that the Block # field is two byte long or 16 bits total which yield 65,536 block numbers (2^16). So this means the largest file TFTP can send or receive is 65,536 x 512 = 33,554,432 bytes or 32MB’s. This is the reason why files transfer with size larger than 32MB’s often fail.

That might not make sense to some of you right now since you might have done some file transfers that are larger than 32MB’s. It is possible to transfer files larger than 32MB’s using TFTP. The only difference is the TFTP Server must support RFC 2348 (TFTP Block Size Option). But that will be the topic for another blog.

So in summary, TFTP Server is a mean to transfer file, used to send/receive file to/from network devices. It uses UDP port 69 and can send or receive a file with a “maximum” size of 32MB’s.

Futher Readings:
Know Your TFTP Server